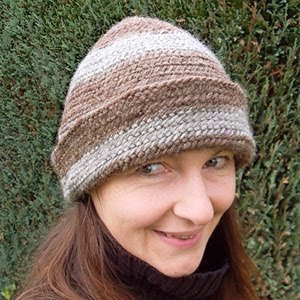
Yes what is that? Naalbinding?
One can already guess that is in the concept of a "needle". And "bind". That's what it is, with a Needle bind.
I had never heard of the technique before, until I hand my girlfriend was my first Häkelsachen Aud. Because they know I'm interested in ancient techniques, she told me about the Naalbinding, for as long Reenactorin knew this ancient art effeff on.
The ancient Vikings knew the trick of turning their spun wool using a simple needle into useful things. It does not work you like knitting or crocheting techniques, both from recent times with a continuous thread from the ball, but a 1-2 meter long thread. And thus forms loops in many variations. Before
could begin, I needed a needle. So I made from a broken branch of my cherry tree by hours of scraping and sanding a wooden needle.
To learn the technique I've used this site: First, the gratitude of
Bernhard . There will be described in detail how to proceed must. But the photos I had, despite their detail and quality even a little mystery, so I also looked up here:
Nadelbinden.de .
There you will find pictures in slight variations, which is very helpful. The nodes in the head finally exploded when I saw moving pictures (and I always say: 1 minute replaced in Action 1000 pictures and words):
The Oslo stitch . (Thank you, "pittyom)
This is stitch as I understand it-as the basic cast of the" thumb method of fishing "means. This one wraps the loop that is always the first in a series of work, once around the thumb.
At first I found it strange. Because unlike crochet where one determines the size of a working link through the size of the crochet hook, the noose of Naalbinding is determined by the thumb.
So pretty big. But in the course of a work is distributed this breadth. If one has the right thread.
A first attempt with a relatively thick yarn was unsatisfactory, because my Knit was too loose (light gray sample). The second attempt with fancy I might have to give me that was just knobbly. (In purple)
The gray-brown background fabric I found in order, as far as the compactness of the stitches. What one can not see: the whole is very large. The Olsostich each thread is passed through three loops. The workpiece makes the desired thickness. But also very elastic
, I would say something like a knitted mesh.
We have to consider that the technology was developed in times when the benefits of a garment had priority over appearance. And useful this technique. You can combine many shorter threads together, the finished work is very solid and warm. If we use unmodified wool fibers can be felt even the finished piece, which was then often made for socks. The practical effect of such a tightly knit work piece is probably be surpassed by anything! And you can specify in advance the form.
have to practice the techniques I then "needled" a cap.
I am somewhat unhappy about the colors. But I just had no wool in the fundus. We'll see if I can spice up the old thing. The comfort is wonderful, very soft and incredibly warm.
Nevertheless, this old technique is not my favorite new technology. As you work with yarn pieces, each thread can be bound up with the next. With the new wool is very good, it "opens" both ends of the threads and matted it again. However, in treated yarns I imagine it difficult.
can also open the work will not again unless we needled each made sling back. So we discover one or more rows before a mistake, you can not do anything.
And The size of the loops depends as I said in my thumb. The gray-brown wool, it comes out, but as my beloved Regia can I forget, unless I want to achieve a kind of lace-effect, as with thin yarn gives a very loose mesh. As one would process a yarn needle size 3 with a 10 needle. Nice for some effects, but also very limited.
I mean wooden needle will thus store only once, and go in search of yarn to jazz up that fits around the brown and gray caps. For as it is I will not these "Vikings" cap screws.


